JK 107 Manual
!!!Important things to know before printing
This machine works on 110 V. There is a transformer in between that changes the 220 V to 110 V .
NEVER EVER plug the 110 V cable directly into a 220 V socket.
1. turn on the switches:
Turn on the main power

Turn on the main switch; it is covered with black plastic.
Do NOT mess with the trafo and the rest of the cables down under the machine
Switches at the back panel

Turn on the switch at the back panel ( 1 )
Check projector switch ( 2 )
Put it on “forward”
Check camera switch ( 3 )
Put it on “forward”
Load the Bolex with the JK manual controller

Use the manual controller to advance the camera in order to thread the unexposed film stock (on a daylight spool) into the Bolex.
Do this in the dark!
Make sure the film is attached to the take-up spool correctly.
If not, it will jam in the camera !!!
Close the lid of the Bolex
Turn on the light on the table

Go to the right side of the machine:
First, turn on the main switch of the lamp (1)
(The fan will start making some noise)
With the turning knob on the right ( 2 )
you can gently turn up the voltage. First turn to around 50 V
Do NOT turn the voltage to higher than 80 V, that will reduce the lifetime of the bulb!
Alignment check and focus adjustments

Open up the diaphragm of the lens ( 3 )

Open the viewfinder with the small lever ( 1)
( On the picture you see the closed position )

Go to the back panel
Unscrew ( 1 ) and ( 2)
Use the left turning wheel ( 4) of the camera
to put the gate out of focus.
This will make it easier to set the diopter of
the eye piece to your eye

Set the diopter of the viewfinder to your eye:
First unscrew the little screw (1)
Use the ring (2) to focus on the grain of the viewfinder
Once you did that, tighten the little screw ( 1)
Threading the film to the projector and getting ready to print
There are 3 steps of threading the film to the projector:
1. Put your feed reel
2. Thread your film through the projector head
3. Attach the leader to the bobby of the take-up reel
See details per steps here:
1. Put your feed reel

Put your feed-reel with 16mm film down at ( 1 ) with the sprockets closest to the wall
Threading the film into the projector head:

Unscrew the nut a little ( 1 ) and turn the bolt + nut in vertical position
Then open part ( 2) by sliding it to the left
Now you can thread the film into the projector head:
Lead the film from down ( 3 ), along the lower sprocketwheel and slide the film from the side into the gate ( 4 ), then go along the upper sprocket wheel, then lead the film up to ( 5 )
Close part ( 2 ) and put the bolt + nut back into the horizontal position and tighten the nut ( 1 )
Attach the leader to the the take-up-reel
Attach the leader to the bobby of the take-up-reel( 3 )
Advance the projector with the controller
Use the manual controller to advance the projector
until you arrive at an image that you want to shoot
Check the alignment and focus :
Go to the back panel
Turn the right wheel ( 3 ) to find the right framing of the image. ( The lens will move closer to or farther away from the gate.)

Then turn the left wheel ( 4 ) to focus.( the camera will move closer to or farther away from the gate )
Once you have found the desired framing and the correct focus, you lock the position of the camera and the lens by tightening ( 1 ) and ( 2 )
Adjusting the left-right orientation of the image can be done with turning knob ( 1 )
Adjusting the up-down orientation of the image can be done with turning knob ( 2 )
Printing the film or making a test
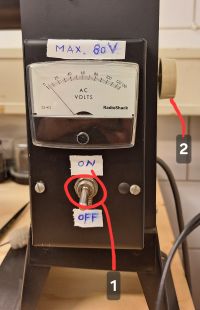 Now turn up the voltage of the lamp to 80 V with knob ( 2 )
on the right side of the lamp house.
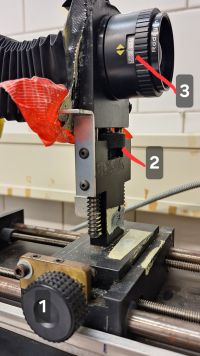 Turn the diaphragm to the desired f-stop ( f-4 to f-8)
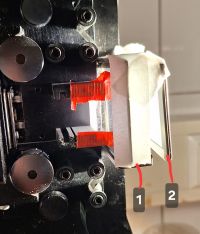 Put the desired ND-filter (and color correction filters if necessary) in the filterslot ( 1 ) behind the whitediffusion glass.
Secure it with paper tape.
You can also tape extra filters behind it, at position ( 2 )

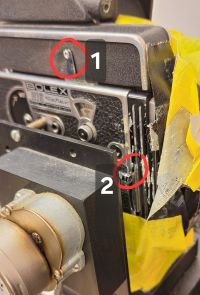 Check if the shutter of the Bolex is open. Lever ( 2 ) should be up.
If the shutter is closed, the lever ( 2 ) will be down, and in the viewfinder you will see a black triangle warning sign at the left bottom of the field.
You can now shoot your film or your test.
Pay attention:
Do NOT leave the lamp on unnecessarily! Dim the voltage as soon as you finish shooting your film.
After lowering the voltage, leave the fan on for about 5 minutes to cool down the lamp
Programming the controller

(The green buttons you use a lot The red buttons you use only in special cases )
To program a freeze frame of 50 frames:
PGM MODE -----> (red light ( 1) will light up )

Camera keys PRESET- 5 - 0 - ENTER

Camera keys ALT COUNT - 5 - 0 - ENTER

Projector Keys ALT COUNT. - 1 - ENTER

PGM MODE -----> (red light ( 1 ) will stop lighting up)
To run the program:
RUN (at the end of the sequence the system will stop automatically)
To pause the program
PAUSE
To continue the program again:
RUN
To stop the program:
STOP
To program a sequence of 100 frames with a speed of 1:1
PGM MODE  -----> (red light ( 1) will light up )

Camera keys PRESET- 1 - 0 - 0 - ENTER

Camera keys ALT COUNT - 1 - ENTER

Projector Keys ALT COUNT. - 1 - ENTER

PGM MODE  -----> (red light ( 1 ) will stop lighting up)
To program a sequence of 100 projector frames with a 2 x slomo
( the new sequence will be 200 frames long)
PGM MODE  -----> (red light ( 1) will light up )

Projector keys PRESET- 1 - 0 - 0 - ENTER

Camera keys ALT COUNT - 2 - ENTER

Projector Keys ALT COUNT. - 1 - ENTER

PGM MODE  -----> (red light ( 1 ) will stop lighting up)
After Printing
1. Put the voltage of the lamp all the way down with knob ( 2 )
Leave the fan on for at least 5 minutes to cool down the lamp
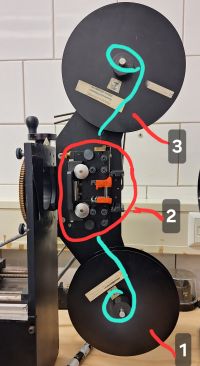 2. Open the gate of the projector and take out your film original.
Close the gate of the projector
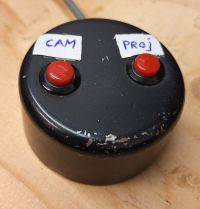 3. Advance the camera with the manual controller for at least 20 frames.
Cut the filmstock at the take-up reel side (when you make a test and want to continue printing)
Or cut the film at the feed reel side (when you finished printing)
4. Take out your exposed film stock (take up reel) and your unexpose filmstock ( feed reel ) from the camera. Again use the manual controller to advance the camera frame by frame. Do this in total darkness
5. Leave a daylight spool in the camera for the next user
6. Rewind your original film on the hand rewind table ( room 3 ) or on one of the small hand rewinders
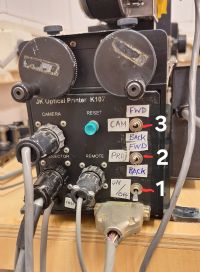 7. Turn off the switch ( 1 ) at the back panel
8. Turn off the switch ( 1 ) of the lamp
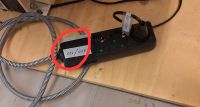 9. Turn off the main power with the switch at the floor
10. Clean up the area: put the filters back in their box, do not leave pieces of film and other stuff behind
PDF Manual created on March 2026
https://wiki.filmwerkplaats.org/images/5/5b/Manual_JK_1._-march_2026_-versie-2.pdf